In this article, we’ll go through the entire process of getting Cloudmattr ready for your business. This includes starting from implementation to launching your first campaign. I’ll assume at this point you’re already created an account, and if not go ahead and create one here.
By the time you complete this guide, you’ll be ready to track your users and their interactions within your website or application and use Cloudmattr to improve your onboarding, engagement, conversions, or revenue retention.
Workspace – Get Your Settings Right
Your Workspace is where everything will live, and each Workspace should be dedicated for a single business (unless you have a clear way you want to organize your business).
- Workspace Name – This will be used in your public pages
- Business Name – This will be used when you use liquid templates within messages
- Domain Setup – This is the URL of your public pages (such as for Boards and Roadmaps), but also where your script will be loaded from for tracking (in next section)
- Time Zone – This should be the time zone your business is located in
- Read more here
Domain Setup
This part is specially important as we support the ability to track and load everything on your website using a:
- Branded domain for your workspace, such as dundermifflin.cloudmattr.com
- Custom domain for your workspace, such as custom.dundermifflin.com
Benefits from using the Custom Domain option is that less ad blockers and browsers will prevent data from being tracked since it won’t be sending data to domains they might classify as trackers. In those cases, using a CNAME can prevent your data collection from being disrupted.
To se this up, you’ll need to:
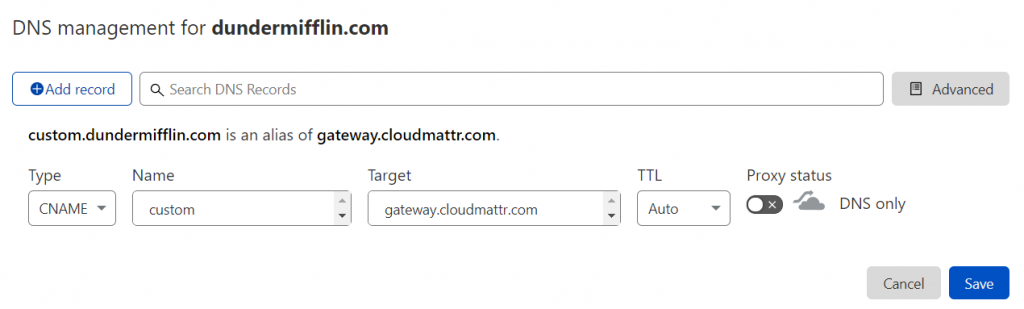
- Select “Custom Domain” under your Workspace Settings and enter the URL you want to use, such as “custom”.
- Add a CNAME record to your DNS, that will need to point the custom domain you added in Step 1 to “gateway.cloudmattr.com”
Implementation – Tracking Users and Events
Before doing almost anything in Cloudmattr, you’ll need to start tracking your users and their actions. This will allow you to use the data to create user segments (audiences) within Campaigns, Checklists, and the rest of the platform.
You can start to do this in multiple different ways, and this just depends on your product or website, you can read more about the differences here. Whatever you choose, you’ll need either your Private Key (if using the API or Zapier) or Public Key (if using JavaScript/GTM) to be able to send the data to your Workspace. This can be found in the API Key page.
We support sending data to Cloudmattr via:
API
This method would be using our API to track users, events, and devices server-side from your backend application.
curl -X POST http://app.cloudmattr.com/api/v1/users \
    -H "Accept: application/json" -H "Content-Type: application/json" \
    -H "Authorization: YOUR_API_KEY"

JSON Body
{
  "id": "asdf1234",
  "first_name": "Michael",
  "last_name": "Scott",
  "email": "[email protected]",
  "avatar_url": "https://mybucket.s3.amazonaws.com/my-folder/a-file.png",
  "properties": {
    "title": "Regional Manager"
,
    "subscription_name": "Pro Plan"
  }
}
JavaScript / Google Tag Manager
This method would be using our JavaScript SDK to track users and events client-side from your website or using a tag manager, such as Google Tag Manager.
Note that this setup is required for Checklists, In-App Messages, and Web Push Notifications. So even if you choose to implement via the API, you’ll need this method for those functionalities.
You’ll need to track a user on every page the the User ID is available, and then fire an event tracking script when you want to track a user action.

Track a User
Ensure that you’re firing the User Tracking script on every page that a User ID is present. This will enable you to fire any JS dependent features (In-App Messaging, Push, Checklists), and track User Events.
<script src="https://cloudmattr.cloudmattr.com/packs/cloudmattr.js?v=1.2.0"></script>
<script type="text/javascript">
  (function() {
    Cloudmattr.init("pk_XXXxxXXxXxXXXxxxxXXxxxXx");
    Cloudmattr.user('asdf1234', {
      first_name: 'Michael',
      last_name: 'Scott',
      email: '[email protected]'
      properties: {
        'title': 'Regional Manager',
        'company': 'Dunder Mifflin Paper Company, Inc.'
      }
    });
  })();
</script>
Track a User Event
<script type="text/javascript">
  (function() {
    Cloudmattr.init("pk_XXXxxXXxXxXXXxxxxXXxxxXx");
    Cloudmattr.event('Link Click', {
      user_id: 'asdf1234',
      properties: {
        'link_text': 'Sign Up Now!',
        'link_url': 'https://app.cloudmattr.com/users/sign_up'
      }
    });
  })();
</script>
Zapier
With Zapier, you’ll be able to send your users and user actions 1000+ sources, so this is a great option if you’re already using Zapier and have your other platforms using it as well.

Once you’ve started tracking data, you can go to Users or Events page to see how the data is coming though to make sure it’s all tracking correctly.
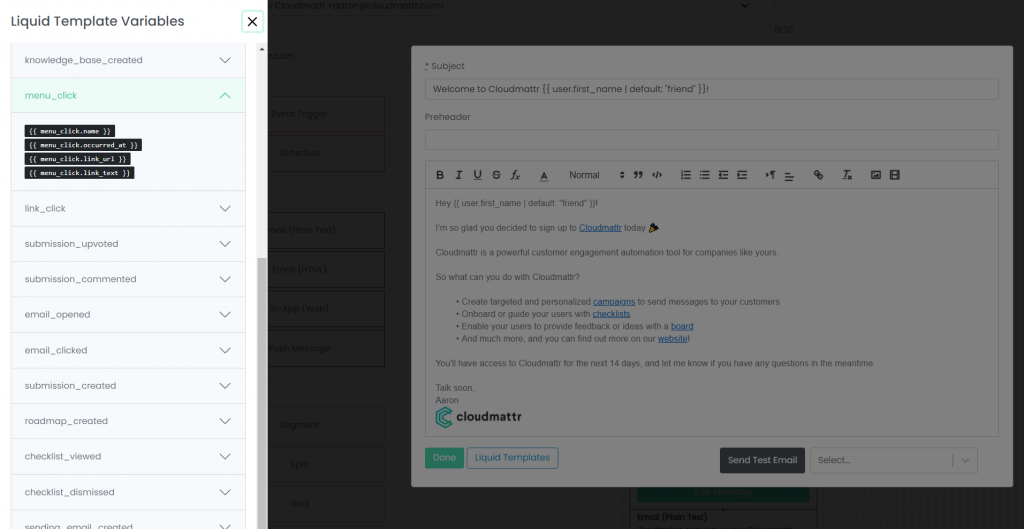
Liquid Templating
In order to really start personalizing the experience of your users, you’ll be able to leverage the Liquid templating language to dynamically information through your messaging to each user differently. If you’re familiar with Shopify and many other platforms that use Liquid, it’ll be really easy to understand.
As you track your Users and Events, the values will become available in the Liquid Template Variables when you’re working in Cloudmattr. We support Liquid within any message (Email, Web Push, Mobile Push, In-App) type and Checklists.
Getting Your Data Into Action
Each message type requires a different setup before you can start sending messages to your users, so now we’ll go through how to setup each one.
Email Setup
To be able to start sending emails to your users, you’ll need to setup the following:
- Sending Emails – Add and verify each email you’ll want to use to send emails from
- Sending Domains – Add and verify each domain
By adding and verifying this, your emails will come directly from your domain and will be completely white-labeled, and Cloudmattr will not be shown to your customers.
Sending Email
- Go to https://app.cloudmattr.com/senders
- Create a new Sending Email
- Enter a name, which will be used as the From in your emails
- Enter the email address
- You’ll receive an email to that email to address from Amazon (which is what we use as our email service)
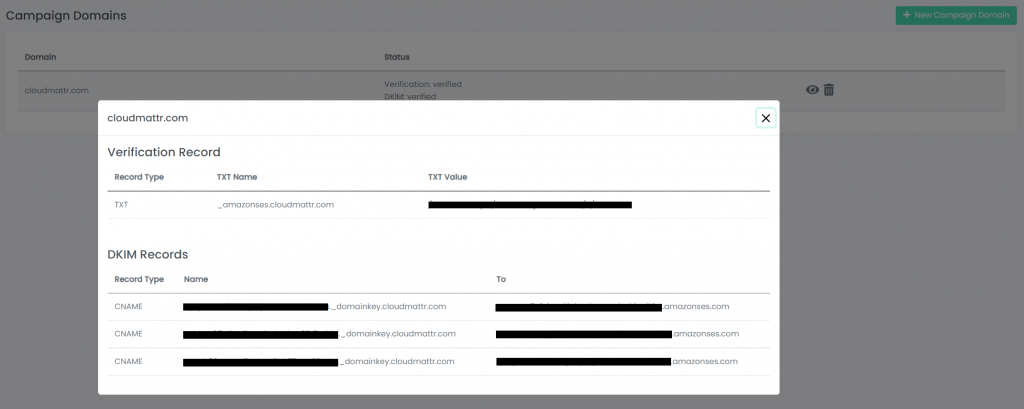
Sending Domain
- Go to https://app.cloudmattr.com/campaign_domains
- Create a new Sending Domain
- Enter your domain, such as “dundermifflin.com”
- You’ll get the verification details that you’ll need to setup via your DNS.
Depending on where your manage your DNS, your setup will be different, for example with Cloudflare, Google Domains, or GoDaddy.
In-App Message Setup
To be able to start sending in-app messages to your users, you’ll need to setup the following:
- Implement Cloudmattr client-side
- Have the Cloudmattr In-App functionality added in script
You’d be able to implement Cloudmattr using our JavaScript SDK to track users and events client-side from your website or using a tag manager, such as Google Tag Manager. In the example below, you can see what it’d look like if setup through Google Tag Manager, which would fire on all pages (with User ID present).
<script src="https://cloudmattr.cloudmattr.com/packs/cloudmattr.js?v=1.2.0"></script>
<script type="text/javascript">
  (function() {
    Cloudmattr.init("pk_XXXxxXXxXxXXXxxxxXXxxxXx");
    Cloudmattr.user('asdf1234', {
      first_name: 'Michael',
      last_name: 'Scott',
      email: '[email protected]'
      properties: {
        'title': 'Regional Manager',
        'company': 'Dunder Mifflin Paper Company, Inc.'
      }
    });
    Cloudmattr.campaign.inApp();
  })();
</script>
Web Push Notifications
To be able to start sending web push notifications to your users, you’ll need to setup the following:
- Implement Cloudmattr client-side
- Have the Cloudmattr Web Push functionality added in script
- Download the Service Worker .js file here
- Upload the Service Worker .js file to your server, and place this file in your site’s root or in a subdirectory path you will never link users to.
- If you place these files in a subdirectory path, they will not conflict with any other Service Workers you have now or may add in the future.
- Example path where to place: https://dundermifflin.com/CloudmattrServiceWorker.js
Web Push Notifications require a Service Worker file to be available on your domain in order to subscribe and receive web push notifications, which is why steps 3 and 4 are required.
<script src="https://cloudmattr.cloudmattr.com/packs/cloudmattr.js?v=1.2.0"></script>
<script type="text/javascript">
  (function() {
    Cloudmattr.init("pk_XXXxxXXxXxXXXxxxxXXxxxXx");
    Cloudmattr.user('asdf1234', {
      first_name: 'Michael',
      last_name: 'Scott',
      email: '[email protected]'
      properties: {
        'title': 'Regional Manager',
        'company': 'Dunder Mifflin Paper Company, Inc.'
      }
    });
    Cloudmattr.campaign.inApp();
    Cloudmattr.campaign.webPush();
  })();
</script>
Configure Safari Push
If you wish to support push notifications for Safari on Mac OS X, follow these additional instructions:
- Go to the Accounts page, and click on Apple logo to go into the settings page
- Upload the .zip file containing your icons, which can be named “safari-iconset.zip”
Example of the iconset file you’d upload in Step 5:
icon_16x16.png
[email protected]
icon_32x32.png
[email protected]
icon_128x128.png
[email protected]
Mobile Push Notifications
In order to be able to reach your users using your mobile application, you’ll need to setup things differently for your Android and iOS applications.
One thing that will be needed for both Android and iOS is tracking the device(s) of each user via the Devices endpoint, which can be read in our knowledge base here.
curl -X POST http://app.cloudmattr.com/api/v1/devices \
    -H "Accept: application/json" -H "Content-Type: application/json" \
    -H "Authorization: YOUR_API_KEY"
Parameters
- user_id
- device_type
- device_id
- payload
{
    "user_id": "abc123",
    "device_type": "android",
    "device_id": "Android - Samsung",
    "payload": {
         "device_token": "abc-token"
     }
}
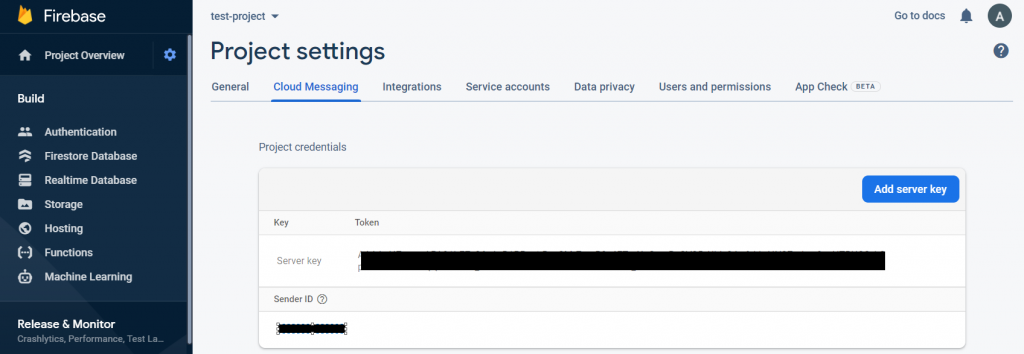
Push Notifications (Android) Setup
To be able to start sending mobile push notifications to your users with Android devices, you’ll need to setup the following:
- Make sure that the Firebase Cloud Messaging API is enabled for your project
- Go to your Firebase Console of your project
- Click on gear icon in sidebar > Project settings > Client Messaging tab
- Copy the “Server Key”
- Go to the Accounts page, and click on Android logo to go into the settings page
- Add the Authentication Key from step 5
Push Notifications (iOS) Setup
To be able to start sending mobile push notifications to your users with iOS devices, you’ll need to setup the following:
- Create a .p8 certificate from APNs
- Go to Certificates, Identifiers & Profiles
- Follow the instructions provided directly by Apple here
- Go to the Accounts page, and click on Apple logo to go into the settings page
- Enter the Key ID, Team ID, and Bundle ID for your app which can be found in your Apple Developer Account
Your First Checklist
To start using checklists, it’s pretty easy to setup and start using to onboarding or guide your users through a setup of steps. You’ll need to:
- Implement Cloudmattr client-side
- Have the Cloudmattr Checklist functionality added in script
<script src="https://cloudmattr.cloudmattr.com/packs/cloudmattr.js?v=1.2.0"></script>
<script type="text/javascript">
  (function() {
    Cloudmattr.init("pk_XXXxxXXxXxXXXxxxxXXxxxXx");
    Cloudmattr.user('asdf1234', {
      first_name: 'Michael',
      last_name: 'Scott',
      email: '[email protected]'
      properties: {
        'title': 'Regional Manager',
        'company': 'Dunder Mifflin Paper Company, Inc.'
      }
    });
    Cloudmattr.campaign.inApp();
    Cloudmattr.campaign.webPush();
    Cloudmattr.checklist.trigger();
  })();
</script>
Once you create and configure your checklist here, you’ll be able to target users and setup something like what you can see below:
Combining User Messaging with Marketing Automation.
In the realm of email marketing, there are various strategies to entice new customers. One powerful approach is leveraging automation, utilizing specialized software to send out emails based on predetermined triggers.
Automating your email and push notification campaigns can significantly enhance efficiency by freeing up valuable time for other essential business tasks. Moreover, it provides valuable data on customer segments, helping you identify the most effective strategies for each group.
For those seeking an easy-to-use tool for user messaging and marketing, or those looking to test the waters without committing resources upfront, we highly recommend Cloudmattr – our all-in-one customer engagement platform.